
 |
| Image Source: Amazon.com |
Disclaimer: Electricity is dangerous stuff - fact! This post is in no way a tutorial, or a set of instructions on how to carry out alterations or repairs to your sewing machine(s) or other electrical appliances. I do not accept any responsibility or liability whatsoever for any losses, damages, injuries, accidents (or any other outcomes) to persons, possessions or to property as a result of anyone reading my post (or my photographs/images) who has then duplicated in full (or in part) my alterations (as shown here and/or elsewhere) upon their own (or upon someone else's) equipment. Persons who do so, do so entirely at their own risk and liability. Electrical work and repairs should always be carried out by an appropriately qualified, registered and insured professional.
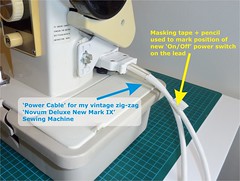
One of my machines is a lovely sturdy Novum Deluxe IX (sometimes also known as a 'Novum New Mark IX'), a zig-zag model built from a solid metal frame (and *less-than-sturdy plastic base). But unlike my modern Brother sewing machine she has no power-switch, so once her power cable is plugged into the mains electricity she is "on" all the time, and I have to crawl under the table to turn her off. I don't like to leave her switched on when I'm not using her - this is because I reckon the bulb must be pretty old and I don't want it to burn out on me from over use (plus then I don't have to hunt down a new bulb to fit it hehe!). Also, where the power lead (a **Janome make lead) slots into the pins on the machine it tends to be a little loose - so if I adjust the positioning of the foot pedal on the floor then the power lead tends to "ping" out of the machine = most, most annoying. And, lastly whenever I seem to plug her into the sockets at home the lead is never long enough, and I end up with a massive spaghetti junction of cables and extension leads going on which a) looks ugly, and b) is a tripping hazard!
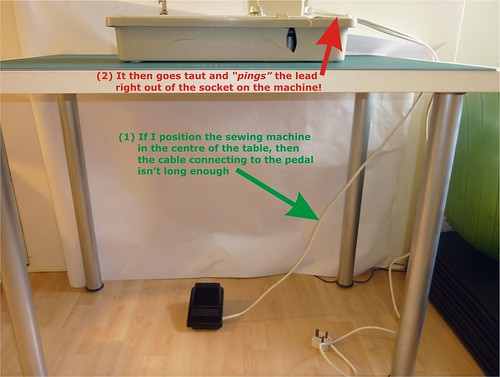
My old power cable / lead - too short for my needs!
So, a few weekends ago with the help of my sexy 'n' gorgeous assistant (aka Hubby) I decided to address these issues in one fell swoop. So, a little shopping trip in the electrical section of my local Wilkinson's store and ***Maplin's and a rummage in the tool box at home yielded me all the supplies and materials I needed. For the princely sum of £6.29 GBP/$10.40 USD (or more precisely £5.00 / $8.25 if you count cost per unit for multiple items in a packet) I upgraded my machine a little :)
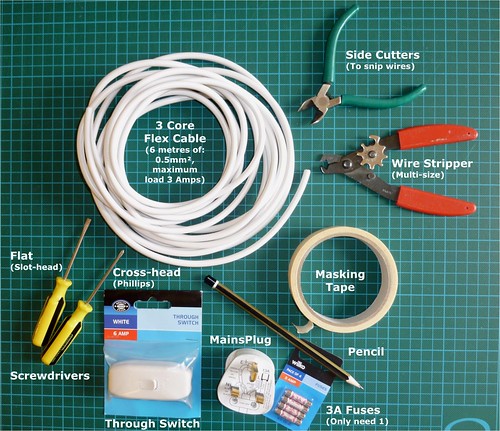
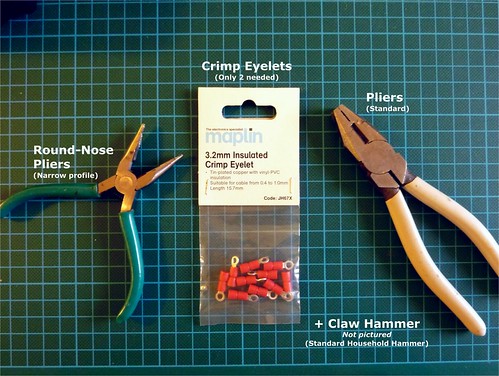
Tools & supplies I used for my DIY
My plan?
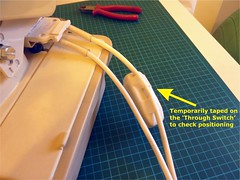
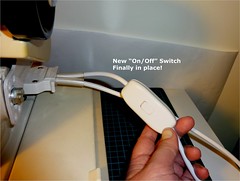
(1) Add an in line on/off toggle switch to the power lead.
(2) Lengthen the lead between the mains socket plug and the machine.
(3) Lengthen the lead between the machine and the foot pedal.
(4) Change the mains socket plug for a new one, and update the fuse too.
Here's a few pics of what I did (loads more on Flickr).
NB: I've not shown how to re-wire a UK mains plug, as there are plenty of DIY books/stuff on the web to show that already :) I simply wired up the new mains-lug and changed out the 13A fuse it came supplied with for the 3A fuse I'd bought.
It took me about 2 hours of fiddling around with wires 'n' dinky little screws etc. (I reckon if I hadn't of been photographing the process as I went along then it would've been half the time).
I'm very pleased with the finished look, and it's sooooo much easier to use her now too :) The first time I turned her on post-surgery the light came on (you cannot independently turn off the bulb) but the motor didn't work when I used the foot pedal (nooooo!). I checked all the wiring (all ok, nothing loose), then I checked the inside of the pedal - and I realised that the metal-copper widget attached to the upper part of the pedal casing was meant to slide up/down against the metal coil of the transformer (house on the lower/bottom part of the pedal). So, when I slotted the pedal back together post re-wiring I had omitted to connect the copper part back properly (doh!). I amended my error easily and bingo - she lives!
Here's the full slide show - all 42 glorious technicolour images (there's text in the "Set" version vs. the slideshow one)
Alternative way to lengthen cables/leads
If you don't fancy opening up the pedal and fiddling around inside (I don't blame you it's time consuming and tricky to boot!), then maybe this would be easier, safer and quicker instead?(1) Buy some new cable + an in-line Terminal Cable Connector block 
Cable Connectors
Image Source: www.gil-lec.co.uk (Electrical Wholesalers)
(2) Cut the old lead no less than 10-15cm (4"-6") from where it enters the pedal. (You can cut it anywhere along the cable - just not too close to the pedal or it will be to awkward to work with!)
(4) Next, strip wires from one end of your new cable.
(5) Attach the exposed wires from the new longer cable, to the terminals inside of the Cable Connector.
(6) The new cable is attached to the empty terminals (the ones on the opposite side to the cables/wires from your old cable - which is still attached to the pedal). It is vital that the colours are matched-up: BLUE with BLUE (NEUTRAL), BROWN with BROWN (LIVE), and GREEN/YELLOW with GREEN/YELLOW (Earth). If the colours are mis-matched it could be dangerous, the motor may stop working, or some one'll get hurt!!
(7) Screw shut the top of the cable connector.
(8) Attach the raw end of the new cable to the plug that goes into the back of your Sewing Machine motor (see photos 7-14 in my Flickr set).
(9) Bingo now there's a longer cable to your foot-pedal!
Repeating the above steps to lengthen the cable between the machine and the mains plug would work too!
|
Here's the full slide show - all 42 glorious technicolour images (there's text in the "Set" version vs. the slideshow one)
Sewing Machines - How They Work / Other DIY Repair Links:
Oh, and I found some other interesting Sewing Machine Repair/DIY sources of information that might come in handy for me in the future below too :-
• How Sewing Machines Work
• How to repair your sewing machine at home? (A couple of pointers)• How to fix your sewing machine in 5 easy steps! (an eBay Guide) • Sewing Machine Trouble Shooting • Replace Foot Control (Video) • How to install a cord on a sewing machine's foot control (Video)
And re: working with Capacitors (which can be dangerous!)
|
*When I purchased her from eBay she had to be shipped to me from the North of England to my home address in London. Sadly, due to lack of bubble-wrap her plastic base became badly cracked and pieces have splintered off boo! She still rests on the base and is usable (although I have to be extra careful when I pick her up & move her around or the base falls off LOL!) - but it looks none too pretty and I'm looking to replace the base and the carry case-lid at some point in the future. The seller placed her directly onto the bottom of a nice strong cardboard box, but there was no padding underneath her - so every time her 19.8kgs mass (43.7lbs) was jostled or bumped around during transit then those knocks transferred straight to her case and hence the damage :(
**Presumably the machine came brand new from the factory with a "Novum" branded power lead and foot pedal, so I guess that at sometime during her lifetime the lead was replaced with the current Janome one?
***Nope - NOT the fictional retro holiday camp of BBC TV fame ("Hi-de-hi!!!" LOL)


.jpg)


.JPG)


.jpg)


0 comments:
Post a Comment
Hi there! If you would like to be notified by email when I (or anyone else) replies to your comment please click the 'Subscribe by email' link under this comment box.